~ Welcome to our Little Vintage Camper Blog…

We bought our Camper/Trailer on Saturday, April 2, 2011

It’s been slow going…but now 4 (now 5) years later, I’m happy to say we are in FULL BLOWN REBUILD MODE!

Won’t you come along and see how we do it.

I hope more than anything…we get to camp soon!

Oh yes, and leave a comment, and let me know you visited…. I love to read them and will answer each one!

Friday, April 15, 2011

Exterior Views- Sharpie Scripture~


I don't have any new progress to show... so while we are having some down time on the trailer I thought I'd show you some random EXTERIOR shots. These are all before we started doing any work on it. 
Except for the last one. 


This is the front. The windows are in tact. One glass pane has been replaced... they are jalousy type windows and they work.  (they crank out)  There is supposed to be a cover that goes over this window; you can sort of see an outline and the hinges. That will have to be replaced. 
 That is NOT an A/C on top.  It is a vent fan with a HUGE cover over the top.  That will be replaced also. 


The RS (roadside) has many vents. We're still trying to determine which vent went to what appliance or holding compartment.  Since we're pretty sure our camper had a Potty inside... We think the lower front vent was for the holding tank  (black water ???) Since it has a hinge and locknut for opening and closing. The other two vents we think are for ventilation for the Refrigerator and Cook stove. 
 The tires are good. Yay! 

 We have to replace the wind up 'jack' on the front. As ours is WOUND UP...and won't go down. And we have no bottles.  I'm searching Craigslist for these ... I saw one for free with a grill last week ; about 1 hr away... we didn't go and get it. 


*** I have 7 sets of windows to make curtains for. I can't wait to get to that part !(the decorating part) I'm tempted to start now... but there is just so much else; and we really haven't discussed color- etc. 
I'd like something with a vintage/retro vibe. Colorful and Fun! 
I'd kind of like to see how the outside paint turns out before I pick fabric and all. 


 In these pictures (the one above and the one below) you can see the sides and the paint pattern.  Where the dark blue is... the metal has a diamond quilted pattern ( I don't know if that is a makers trade mark OR just the style for that era of trailer making)  But... I've seen some pictures and I think the piece at the bottom -below the front windows may have been the same and painted the same... I've see that pattern on another trailer... (though it wasn't the same shape as ours)  
Also... We have the original door jam with screen door hinges... but I think that will all have to be replaced. 
Right now we have the cargo door ...seen below ...off the trailer and are waiting to cut the hole for that and re-attach the tail lights; which are needing to be replaced. 


The rear window is completely (well there is one) paneless. The jalousy mechanism works... but most of the glass is gone.  Honey is tweaking that door and it's trim work and we've got a replacement locking handle for it too. 
I've taken it upon myself to incorporate a little prayer and truth into this little trailer.  I hope to wash it in the word.  Where ever possible when we are re doing a space... I use my handy dandy Sharpie marker and write a little scripture on the wall. Then it is covered up with the siding. This is the side panel next to the door. I also wrote Ephesians 2:8  on the front wall before it was covered but didn't get a shot of it. 


Maybe one day if this trailer ever has to be 'remodeled' someone will find it and they'll get a blessing out of it too! 


***As always-- if by viewing these photos you know anything at all about the make , year and model of our little trailer please leave me a comment below or email me (use the contact me link in the sidebar). 

Wednesday, April 13, 2011

Photo Problems???

Are you able to see the photos I place on Coffee-Can ? 

I seem to be having issues. 
Most of my photos when I click over here 
are little 
Window's icons... 

Can you see them? 
Just checking... 
I guess if you could NOT see them...then, you my faithful followers... would tell me right? 

Kind of like if I HAD DIRT ON MY FACE RIGHT? 

I could trust you with THAT couldn't I? 


Thanks for reading 
~Grace and Peace~

Monday, April 11, 2011

The Rear has Been Brought UP!

I last posted about the Tear out version:  Back inside the Rear  and  Bringing up the Rear  
you can click on those links to read them. 

This is replacing the studs in the wall and exterior plywood sheathing. 
We only had to replace from the window down;  so the blue you see is the tarp pulled up and holding the aluminum rolled up and out of the way so we could work. 

Honey has rebuilt the studs across the back of the trailer in this picture. 
 Believe it or not... This was a pretty easy task; rebuilding the rear wall. In this picture you can see that the corner post  is good (you'll see the opposite one on down in the post)

 The studs in this particular trailer are generally 2x2's or 2x4's as I've said before; sometimes they are pieced together to make a 2x6. In rebuilding this back wall;  we were out of 2x2's so this is 2 - 2x3's that we had and repurposed them  to reconstruct the wall. We also used a 2x4 going along the middle  and a 2x3 (white) that was repurposed from the bed that had been built by the previous owner. All good wood, although it appears to be worn in some areas-- it is very sturdy now.

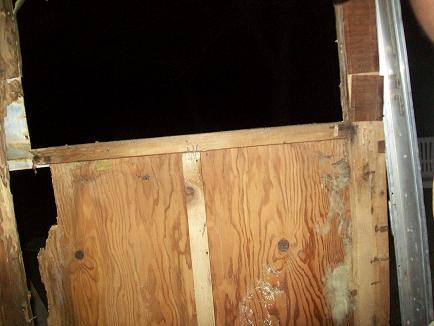
This is the plywood put into place.  We cut the end off to measure the width of the trailer and then Honey cut out for the window. So it is all one piece.
 I think that the reason they call this 'ply'wood--- is because IT IS SO PLIABLE. It molds to the shape we need so easily. This piece curved just were we needed it and is held easily with screws.

 One piece of plywood is all it took from the top of the window- (covered by the tarp)

 View from inside- with Tarp covering the window opening. The plywood meets up right at the top of the window; just under the pink insulation.
In this window you can see that the corner post in the rear is in really good condition, I mentioned this in a previous post-- We did NOT have to replace these (both rear corners were good,surprisingly) 

 Rolling the aluminum skin back down getting ready to cover the plywood. 

Fastening Aluminum~ 
You can see that we have not cut out for the cargo hold door yet. 
We have some smaller pieces of plywood that have to be added inside to beef up the lower corners where the tail-lights will be and then we will be replacing the rest of the aluminum siding and door trim. 


Tarp Tying 101~ 

 Weather Predictors were calling for rain.

Here is the trailer all buttoned up for rainy weather.

It held pretty well. We had pretty severe weather here in East Texas last night.
Our county  and our little Town had Tornado Warnings early this morning; and several Tornadoes were indicated throughout the area.  (Dallas, Kaufman, and Hunt Counties)

Thanks for Reading
Grace and Peace. 

Sunday, April 10, 2011

"Back" inside: The Rear

Got Tools? 
Ye Old Shoppe Vac~ 

 Ye Old Saws-All~ 
(meaning: it saws all! wood,nails,  metal, nails, thick or thin it saws it. Did I mention NAILS?
See that home made bed- platform? 
Gone. 
Good ol' saws-all! 
Taking out the door. 

Door: Gone

Ye Old Man~ 
(just kidding... I hardly ever refer to him as that...but it fit Ye Old Theme!
Interior paneling; window; tail-light sections; cargo-door- 
Gone. 
Good ol' hubby! 
(aka: Honey) 
CS (curbside) corner and rear ply wood- all needs replacing. 

RS (roadside) corner and rear ply wood all needs replacing 
-- as well as the two spots that would flank the cargo door... 
this is where the tail-lights need to be-- we have to rebuild this wall FROM THE TOP OF THE WINDOW DOWN! 
(that's in another post) 
I guess it could be worse-- 
we don't have to rebuild the entire wall. 
We don't have as many studs to replace like the front wall. 
AND! the greatest part
The corner studs are still intact and looked almost new-- they were covered with original panel still. 
So again... YAY!

Thanks for Reading
Grace and Peace 

Saturday, April 9, 2011

Bringin' Up the Rear--

 These are pictures of the REAR- TEAR OUT PHASE---
I'll show you pictures and tell you what I know what I think I know.
 (If you have information or details as always-- please, pass it on to me- cause I'm still learning and researching)

YES! Those are huge nails right thru the aluminum siding. Dog-gone it! 
The tail lights I think are called Wedding Cake lights. 

Both are cracked and broken and needing to be replaced. 
The paneling underneath these lights is rotted (but that's another post) 
The bumper is square and hollow. 


In doing my research and from what I've seen snooping around at other trailers...
this bumper is for holding a 'sanitation- dumping hose' 
YAY! 
That tells me that my little Camper had a Potty inside...AT SOME POINT. 
I Sooooo want a POTTY INSIDE.
So now we have to figure out where it went. That is why I took some crazy pictures of the ceiling.  

 This is the trim (coming from the top of the picture down)and it was screwed on with hex-head screws.Then along the edges where the side metal meets the rear metal... I don't know if you can see the detail or not... but... those are nail holes; more like little tacks to hold that metal down.


Once you get all those little nails out...using a pair of vice grips or channel locks...(whatever your tool of choice  WEAR GLOVES...THE METAL IS SHARP AND IT WILL CUT YOU!)
ANYWAY... under that... are little tiny staples holding the first layer of metal (in this case the side panel) to the plywood. 
So... 
SCREWS
NAIL-TACKS
STAPLES. 
I guess whatever works-- I'm figuring this trailer is about 50 plus years old- and what ISN'T EATEN OR ROTTEN--- IS STILL HOLDING! 
OK... 
AND THIS IS WHERE I ASK FOR YOUR HELP.... 

I told you there are no IDENTIFICATION MARKS on our trailer. 
We don't know the 
MAKE
YEAR
MODEL 
nothing. 
But twice I've found these markings on the inside of the metal skin... 

You know anything about OKIE MANUFACTURING? 
This was written on the front panel and the rear panel... ?  
I've done a little search-- not exstensively. 
I've found nothing. 

I'm wondering if anyone knows of a metal manufacturer that would have provided the metal skin for campers back in the day?  If so what makers? 
I so want to know about our trailer!!! 
Thanks for Reading
Grace and Peace

Thursday, April 7, 2011

Good Bones--

Since Saturday we have gotten quite a bit done. I have tons of pictures and trying to sort and organize them into sets suitable for posting! 
I think these pictures were taken on Monday (after 2 days of tear out and planning)
**You can read out the TEAR OUT here.**

This is the front wall and CS wall REBUILD.

 The bottom portion of the wall is built at an angle/slant -- we had to go back that way
1. because it looks cool
2. the outside skin is cut to fit that design
3. It looks cool!

 We had to reframe the window with 2x2's and a 2x4 going across underneath the window --You can see the new corner post --remember it was almost completely rotted away. After nailing the 2x2 and 2x4 together they that to be cut to accommodate the slanted front bottom portion and cut at the top to accommodate the rounded roof.
 this is just another view.  The ply wood on the floor is in the corner is just laying there.
 This is the outside view of the work we did. Underneath the aluminum sheathing that plywood is the full width  which is 48 inches-- It is positioned from the top portion of the window and comes down at a slight curve just below the aluminum and stops.
 This picture shows the small piece of plywood attached to make the angle design on the front of the trailer.

 Close up view of  front fastened plywood pieces.

This is the exterior CS wall where the side window goes. This sits just in front of the door. It hasn't been cut out for the window yet.

 Another view. 
 You can see Honey's hand-- he is cutting out for the window using the saws-all.

This is just a smidgen of the window you can see from the inside ; the framing is and ply wood has been started for the CS window.

We've used mostly new material. I think the plywood around the outside CS window was something we had-- but overall the project has only cost about $150.00 (and that was all gift cards from my birthday party) -Woot-woot!

Thanks for Reading-
Grace and Peace!

Our Rotten Trailer-

On Saturday morning we bought our trailer and went back to get it and TOWED IT HOME. Saturday afternoon- we had a birthday party to attend and after that we came home and tore into IT. We were very eager-- can you tell? 
We found a couple of areas that need some quick attention.

 We've been hard at work everyday but Monday-- since we brought the trailer home. 
Currently, I have a bunch of pictures to download, resize and delete...hehehe! AND then get them posted.
So I'll get right to them. 

This is the TEAR OUT of the front and front Curbside Windows. 
 Front window opening. Inside paneling and make-shift shelving removed. 
 The framing and studs in this trailer are mainly 2x2's and a few 2 x 4's sometimes scabbed together to make 2x6's ... 
The above photo is very rotted 2x2 running along under the window opening, with a 2x4 and a very rotted piece of 1/4 inch plywood.
 This is from inside the trailer looking back at the door jam and window-- all very rotted; especially that front CS (curbside) corner stud.  
Close up of door jam and wall panel under that front side window... that is yellow insulation (not mold) stuck to the ply wood. 
 At first this appears to be water damage only.  You can see where the paneling has gotten wet. We've determined the roof to be in fairly good shape...except around the overhead vent fan. We think this is water spray from the road--- and CARPENTER ANTS! 
 At this point we've pulled a big sheet of aluminum skin off the outside and have assessed our damage and pulled rotten debris from the walls and studs. This is all of the stud that was left hanging -- like a rotten tooth. 
 There is no corner support here. So we had to use a 2x4 and some plywood shims to support the ceiling (that is the board you see coming down to the right in the picture.  It held the ceiling up and helped to sturdy the trailer--- as our days have been pretty windy so far in April. 

All of this came out and was rebuilt. 

We were able to get the trailer wall built and pieced back together Sunday and Tuesday. 
More of that to come. 

Grace and Peace